Battery switch on travel trailer function is crucial for managing your RV’s power. This guide dives into the hows and whys of these switches, covering different types, safe operation, troubleshooting, and essential maintenance. We’ll explore everything from basic functionality to advanced diagnostics, ensuring you’re confident in handling your travel trailer’s electrical system.
Understanding your battery switch is key to preventing frustrating power outages and ensuring a smooth and enjoyable RV experience. We’ll break down the complexities into easy-to-understand steps and provide practical advice for every RV owner, regardless of experience level. Get ready to master your travel trailer’s power!
Understanding Battery Switch Functionality in Travel Trailers
Your travel trailer’s battery switch is a crucial component for managing power, ensuring you can safely use your appliances and recharge your batteries while on the road or at a campsite. Understanding its function and proper operation is key to avoiding electrical problems and maximizing your RV’s lifespan.
Battery Switch Purpose
The primary purpose of a battery switch in a travel trailer is to control the flow of power between your trailer’s batteries and the various electrical systems. This allows you to isolate the batteries when not in use, preventing accidental discharge and protecting your batteries from damage. It also enables you to choose which battery bank (if you have more than one) powers your trailer’s systems.
This is especially important if you have a dedicated deep-cycle battery for house functions and a starting battery for your vehicle.
Types of Battery Switches
Several types of battery switches cater to different needs. A single battery switch simply connects or disconnects a single battery to the trailer’s electrical system. A dual battery switch manages two batteries, typically allowing you to select between them, connect both, or disconnect both. A more sophisticated selector switch provides more granular control, offering various combinations for charging and using different battery banks.
Some advanced switches even incorporate features like battery monitoring and remote control.
Operating a Battery Switch
Proper operation of your battery switch is essential. Before you begin, always ensure your hands are dry to prevent electrical shock. The exact steps depend on the type of switch you have, but generally, the process involves:
- Identify the switch positions: Familiarize yourself with the labels on your switch, usually indicating “Off,” “Battery 1,” “Battery 2,” “Both,” or similar options.
- Select the desired position: Carefully rotate the switch handle to the position that aligns with your needs. For example, to use only the house battery, select “Battery 1”. To charge both batteries from shore power, select “Both”.
- Verify the connection: After switching, check your trailer’s electrical system to ensure power is flowing correctly to the intended components. A multimeter can be helpful in verifying voltage at different points in the system.
- Turn off the switch when not in use: This prevents unwanted battery drain and potential damage.
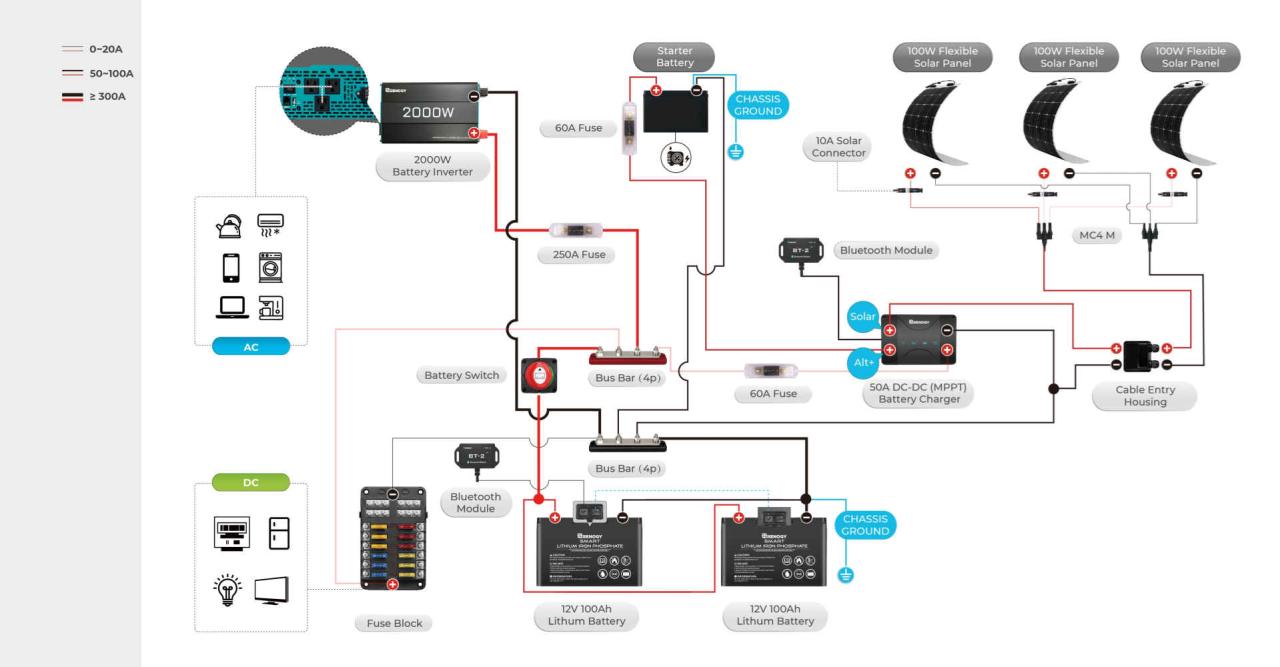
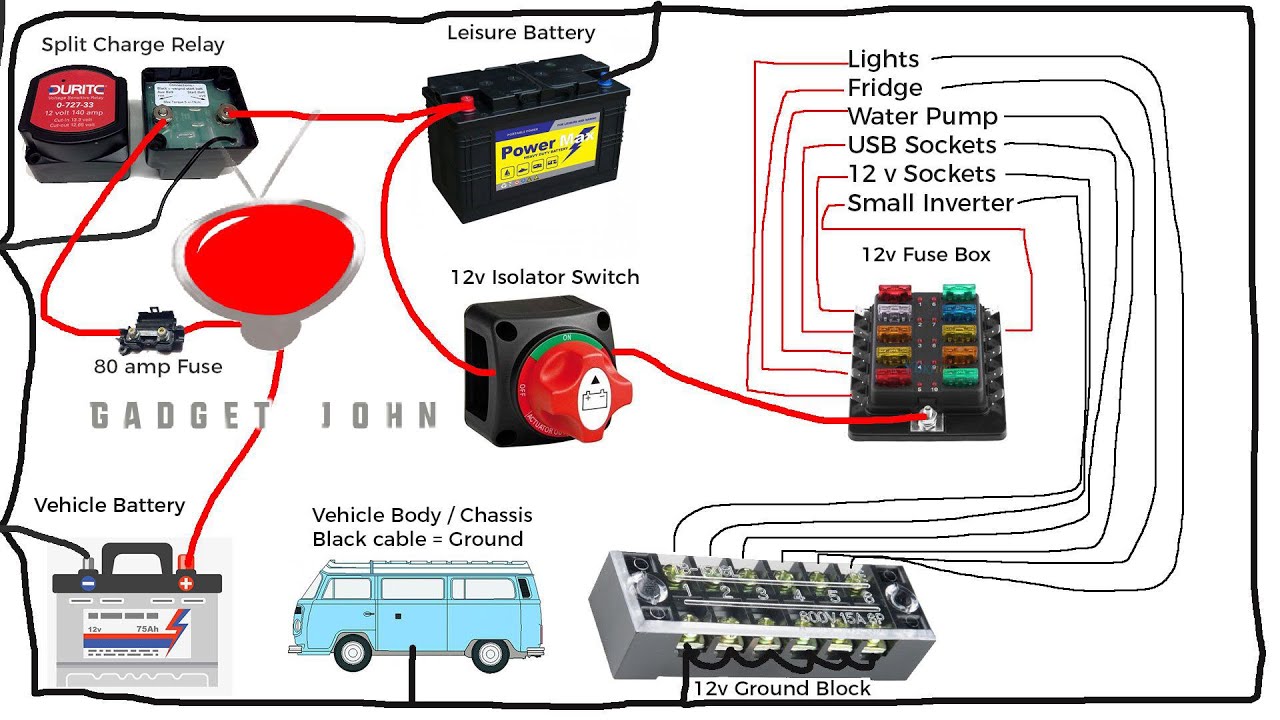
Typical Battery Switch System Diagram
Imagine a simple diagram: Two batteries (Battery 1 and Battery 2) are each connected to one of two terminals on the battery switch. The other two terminals of the switch connect to the positive (+) and negative (-) buses of the trailer’s electrical system. A central handle allows the user to switch the connections, controlling the flow of power.
The negative (-) side of the batteries is usually connected directly to the trailer’s chassis, completing the circuit. This setup provides a clear path for electricity to flow from the selected battery(ies) to the trailer’s components. This system also incorporates a main breaker or fuse for additional protection.
Connecting and Disconnecting Batteries
Connecting and disconnecting your RV batteries to the battery switch is a crucial part of maintaining your power system and ensuring safe operation. Doing it correctly prevents damage to your batteries and your trailer’s electrical system. This section details the best practices and safety procedures involved.Properly connecting and disconnecting your batteries to the battery switch is essential for maintaining your RV’s electrical system and preventing damage.
This involves understanding the correct procedure, taking necessary safety precautions, and verifying the connections before use. Troubleshooting faulty connections is also covered to help you resolve potential issues.
Battery Connection and Disconnection Best Practices
Always disconnect the negative (-) terminal first when removing a battery from the circuit, and reconnect it last when installing a battery. This minimizes the risk of accidental short circuits. Use a wrench or pliers appropriate for the battery terminal size, avoiding any damage to the terminals. When disconnecting, ensure a firm grip to prevent slipping and accidental contact with other metal parts.
Keep the terminals clean and free of corrosion to ensure a good connection. Tighten connections securely, but avoid over-tightening, which can damage the terminals. For multiple batteries, follow the same procedure for each battery, working from negative to positive.
Safety Precautions When Working with RV Batteries
Working with RV batteries requires careful attention to safety. Always wear safety glasses or goggles to protect your eyes from potential splashes of battery acid. RV batteries produce hydrogen gas, which is highly flammable and explosive. Ensure adequate ventilation in the area where you’re working to prevent gas buildup. Never smoke or use open flames near batteries.
Wear gloves to protect your hands from battery acid and corrosion. If you spill battery acid, neutralize it immediately with baking soda and water, and then clean thoroughly. Be mindful of the battery’s weight; lift carefully to avoid injury.
Battery Connection Verification Checklist
Before using your RV’s power system, it’s crucial to verify the correct battery connections. This simple checklist will help you avoid potential problems.
- Check for Corrosion: Inspect battery terminals for corrosion. Clean them with a wire brush and baking soda if necessary.
- Secure Connections: Ensure all battery cables are securely connected to both the battery terminals and the battery switch.
- Correct Polarity: Verify that the positive (+) and negative (-) cables are connected to the correct terminals on both the battery and the switch. Incorrect polarity can cause damage to your electrical system.
- Cable Condition: Inspect the cables for any signs of damage, such as fraying or cracks. Replace damaged cables immediately.
- Switch Position: Confirm that the battery switch is in the correct position for your intended use (e.g., “Both,” “Off,” “Battery 1,” “Battery 2”).
Troubleshooting Faulty Battery Connections
If you experience problems with your RV’s power system, a faulty battery connection might be the culprit.
- Visual Inspection: Begin with a thorough visual inspection of all connections, looking for loose wires, corrosion, or damaged cables.
- Voltage Test: Use a multimeter to check the voltage at the battery terminals and at the switch. A significant voltage drop indicates a problem in the connection.
- Clean Connections: If corrosion is present, clean the terminals with a wire brush and baking soda solution. Apply a corrosion inhibitor to prevent future corrosion.
- Tighten Connections: Ensure all connections are tight. If necessary, use appropriate-sized wrenches or pliers.
- Replace Damaged Cables: If you find damaged cables, replace them immediately with cables of the correct gauge and length.
Battery Switch Types and Their Advantages
Choosing the right battery switch for your travel trailer is crucial for managing power effectively and preventing problems. Different switches offer various features and benefits, making the selection process dependent on your specific needs and setup. Understanding these differences will help you make an informed decision.
Let’s explore the common types of battery switches and their suitability for different configurations. The key considerations include the number of batteries (single or dual), the presence of solar panels, and your desired level of automation.
Battery Switch Types Compared
The following table summarizes the key features, advantages, and disadvantages of various battery switch types. Consider these factors carefully when choosing a switch for your travel trailer.
| Type | Features | Advantages | Disadvantages |
|---|---|---|---|
| Manual Rotary Switch | Simple design, typically 2-position (battery 1, battery 2, or both), some models offer a “off” position. | Inexpensive, easy to understand and operate, durable, requires minimal maintenance. | Manual operation, can be inconvenient to switch between batteries frequently, limited control. |
| Manual Perko Switch | Multiple positions allowing selection of individual batteries or both combined, often includes a “off” position for complete disconnection. | Robust construction, good for high-current applications, reliable. | Manual operation, slightly more expensive than a simple rotary switch. |
| Automatic Battery Switch (e.g., based on voltage sensing) | Automatically switches between batteries based on voltage levels. Prioritizes a fully charged battery. | Convenience, automatic prioritization of fully charged batteries, protects against deep discharging. | More expensive, potential for malfunction (though usually reliable), requires proper installation and setup. |
| Automatic Combining Switch with Solar Integration | Combines batteries and allows for charging from solar panels and shore power simultaneously, often with intelligent charge control features. | Maximizes battery charging efficiency, simplifies power management with solar, often includes low-voltage protection. | Most expensive option, complex setup requiring specialized knowledge, potential for higher failure rate due to complexity. |
Ideal Battery Switch Types for Different Setups, Battery switch on travel trailer function
The best battery switch type depends heavily on your specific needs. Let’s consider some common scenarios.
Single Battery Setup: A simple manual rotary switch is usually sufficient for a single battery system. The added complexity and cost of an automatic switch are unnecessary in this case.
So, you’re planning a trip? Awesome! Before you pack your bags, remember travel insurance is key. Check out Aon travel insurance for comprehensive coverage. They offer various plans, so finding the right fit for your adventure shouldn’t be a hassle. And if you need more options or want to compare prices, another great place to look is Aon travel insurance – they often have special deals.
Seriously, don’t skip this step; peace of mind is priceless!
Dual Battery Setup without Solar: A manual Perko switch offers excellent control and reliability. An automatic switch could be considered for convenience, but the added cost might not be justified for a simple dual-battery setup.
Dual Battery Setup with Solar: An automatic combining switch with solar integration provides the best solution for managing charging from multiple sources and ensuring optimal battery performance. This setup offers the most convenience and maximizes efficiency.
Automatic vs. Manual Battery Switches: Pros and Cons
The decision between automatic and manual battery switches comes down to convenience versus cost and complexity. Manual switches are simpler, cheaper, and more reliable in the long run, while automatic switches offer ease of use and more sophisticated battery management.
Automatic Switches: The main advantage is convenience; you don’t need to manually switch between batteries. They also typically include features like low-voltage disconnect to prevent complete battery drain. However, they are generally more expensive and can be more prone to failure than manual switches. Proper installation is crucial.
Manual Switches: Manual switches are generally less expensive and more robust. They are less likely to fail and are easier to repair. However, they require manual intervention to switch between batteries, which can be inconvenient, especially if you frequently switch between sources.
Troubleshooting Common Battery Switch Issues: Battery Switch On Travel Trailer Function
Dealing with a faulty battery switch in your travel trailer can be frustrating, but with a systematic approach, you can usually identify and fix the problem. This section Artikels common issues, diagnostic steps, and solutions to get your power system back online. Remember safety first: always disconnect the negative battery terminal before working on any electrical components.
Diagnosing Non-Functioning Switches and Low Battery Voltage
A non-functioning battery switch can manifest in several ways: no power to the trailer, flickering lights, or appliances not working. Low battery voltage, on the other hand, often points to a charging problem or excessive drain. To diagnose these issues, a visual inspection is the first step. Check for obvious signs of damage to the switch itself, loose wiring, or corrosion on the battery terminals.
So, you’re planning a trip? Awesome! Before you jet off, remember travel insurance is key. Check out Aon travel insurance for comprehensive coverage. They’ve got options to suit different budgets and trip lengths. And if you’re feeling extra cautious, compare that to Aon travel insurance – sometimes a second opinion is helpful to find the perfect fit for your needs.
Getting insured is a small price to pay for peace of mind!
If nothing is immediately apparent, use a multimeter to perform more in-depth testing.
Testing the Battery Switch with a Multimeter
A multimeter is an essential tool for electrical troubleshooting. First, ensure the switch is in the “off” position. Then, using the multimeter’s DC voltage setting, measure the voltage across the battery terminals. You should read a voltage close to the battery’s rated voltage (typically 12V for a 12V system). Next, switch the battery switch to the “on” position and re-measure the voltage at the output terminals of the switch.
If the voltage is significantly lower or zero, the switch itself may be faulty. If the voltage is consistent with the battery voltage, the problem likely lies elsewhere in the wiring or appliances. A significant voltage drop between the battery terminals and the switch output indicates a problem within the switch or its wiring.
Resolving Corrosion on Battery Terminals
Corrosion on battery terminals is a common cause of poor electrical connections and reduced battery performance. This corrosion acts as a resistor, reducing the current flow and leading to problems with your battery switch and other systems. To clean the terminals, you’ll need a wire brush, baking soda, and water. First, disconnect the negative terminal. Then, use the wire brush to thoroughly clean the corrosion from both the terminal and the cable clamp.
Make a paste of baking soda and water, and apply it to the cleaned terminals. Let it sit for a few minutes to neutralize any acid buildup. Finally, rinse with water, reconnect the negative terminal, and retest the system. Repeat this process for the positive terminal.
Troubleshooting Flowchart for Battery Switch Problems
A visual flowchart can simplify the troubleshooting process.  This simplified flowchart illustrates the process. A real-world flowchart would be more detailed, incorporating more specific checks and potential solutions. Remember to consult your trailer’s manual for specific troubleshooting information.
Maintaining the Battery Switch System
Keeping your travel trailer’s battery switch system in top shape is crucial for reliable power and to prevent costly repairs down the road. Regular maintenance ensures your batteries deliver consistent performance, preventing unexpected power outages during your adventures. Neglecting this system can lead to corrosion, premature battery failure, and even potential fire hazards.A routine maintenance schedule should be implemented to maximize the lifespan of your battery switch and associated components.
This includes both preventative measures and regular inspections to catch any potential problems early. Paying attention to detail will ensure your power system remains dependable.
Battery Switch and Component Inspection
Regularly inspect the battery switch itself for any signs of damage, loose connections, or corrosion. Check the switch’s handle for smooth operation and ensure it clicks firmly into each position. Visually examine all wiring connected to the switch for any fraying, wear, or loose connections. Pay close attention to the areas where wires enter the switch housing, as these are vulnerable points.
A simple visual check every three months is a good starting point, and a more thorough inspection annually is recommended.
Cleaning and Maintaining Battery Terminals
Battery terminal corrosion is a common problem that can significantly impact your RV’s electrical system. Corrosion creates resistance, reducing the flow of electricity and potentially leading to battery damage. To clean your battery terminals, you’ll need a wire brush, baking soda, and water. First, disconnect the battery cables from the terminals. Then, use the wire brush to scrub away any corrosion.
Next, make a paste of baking soda and water and apply it to the terminals. Let it sit for a few minutes, then scrub again with the wire brush and rinse with water. Finally, reconnect the battery cables, ensuring a tight connection. This cleaning process should be performed at least twice a year, or more frequently if you notice signs of significant corrosion.
Regular Battery Testing
Regular battery testing is vital for ensuring your batteries are in good health and capable of delivering sufficient power. You can use a multimeter to check the voltage of each battery. A fully charged 12-volt battery should read around 12.6 volts. Lower readings indicate a lower state of charge, and consistently low readings might signal a problem requiring attention.
A load test is even more informative, simulating the actual load on the battery to assess its ability to supply power under demand. Battery testing should be done at least twice a year, ideally before and after the main camping season.
Essential Maintenance Tasks and Frequency
- Visual inspection of battery switch and wiring: Every three months
- Thorough inspection of battery switch and wiring: Annually
- Cleaning battery terminals: Twice a year, or more often if corrosion is present
- Battery voltage test: Twice a year
- Battery load test: Annually, or if you suspect a problem
Impact of Battery Switch on Travel Trailer Systems
Your travel trailer’s battery switch is the central control for your DC power. Understanding its function is crucial for reliable operation of your appliances and overall system health. A properly functioning switch ensures power flows correctly to your systems, while a faulty one can lead to significant problems.
The battery switch acts as a gatekeeper, determining which battery bank (or neither) provides power to your trailer’s 12-volt appliances. This impacts everything from your interior lights to your water pump. Furthermore, the interaction between the switch and your charging system is critical for maintaining a fully charged battery bank, ready for off-grid use. A malfunctioning switch can prevent proper charging, leading to a dead battery and a non-functional trailer.
Battery Switch Impact on Appliance Operation
The battery switch directly controls the flow of power to various 12-volt appliances in your travel trailer. When the switch is in the “off” position, no power flows to these appliances, regardless of the battery’s charge. In the “battery” position, power is supplied from your house batteries, and in some switches, the “both” or “combine” position allows for charging from the shore power or alternator while simultaneously powering your appliances.
A faulty switch can interrupt this power flow, resulting in non-functional appliances.
Relationship Between Battery Switch and Charging System
The battery switch plays a crucial role in the charging process. Many charging systems require the battery switch to be in the correct position to properly charge the house batteries. For example, a typical setup might require the switch to be in the “battery” or “both” position for the converter to charge the batteries. If the switch is faulty or incorrectly positioned, the charging system might not function correctly, leading to undercharged batteries.
This could leave you without power when you’re off-grid.
Impact of a Faulty Battery Switch on System Performance
A malfunctioning battery switch can have widespread consequences. The most obvious impact is the inability to power your appliances. This could mean no lights, no water pump, and potentially no refrigerator operation, depending on your setup. Beyond immediate appliance failure, a faulty switch can also lead to premature battery drain due to parasitic draw or prevent proper charging, ultimately shortening the lifespan of your batteries.
In extreme cases, a short circuit in the switch could even cause a fire hazard.
Troubleshooting Table
This table summarizes the potential impact of a faulty battery switch on various appliances and recommends actions to take.
| Appliance | Impact of Faulty Switch | Recommended Action |
|---|---|---|
| Interior Lights | Lights will not turn on, even with sufficient battery charge. | Check the battery switch position. If the switch is faulty, replace it. Inspect wiring for damage. |
| Water Pump | Water pump will not function, resulting in no water pressure. | Verify the switch is in the correct position. Test the pump directly with a multimeter to rule out pump failure. Replace the switch if necessary. |
| Air Conditioner (12V) | Air conditioner will not start or will intermittently shut off. | Ensure the switch is correctly positioned. Check the air conditioner’s breaker and fuses. Consider having the air conditioner serviced if the problem persists after checking the switch. |
| Refrigerator (12V) | Refrigerator will not operate or maintain temperature. | Check the battery switch position and the refrigerator’s fuses. Inspect the wiring for any loose connections. If the problem persists, consider contacting a qualified technician. |
Safety Considerations and Best Practices
Working with RV batteries and their switching systems requires careful attention to safety. Improper handling can lead to serious injury from electric shock, burns, or exposure to corrosive battery acid. Following established safety procedures is crucial to prevent accidents and ensure a long lifespan for your battery system.RV batteries contain sulfuric acid, a highly corrosive substance that can cause severe burns to skin and eyes.
Furthermore, the batteries themselves generate explosive hydrogen gas during charging and discharging. A spark near a battery, even a small one, can ignite this gas, resulting in a potentially dangerous explosion. Improper connections can lead to short circuits, generating intense heat and potentially causing fires.
Personal Protective Equipment (PPE) Usage
Before working on your RV battery system, always don appropriate personal protective equipment (PPE). This includes safety glasses or goggles to protect your eyes from splashes of battery acid, rubber gloves to protect your hands from corrosion and electric shock, and a face shield to provide additional protection for your face and neck. Closed-toe shoes are also recommended to protect your feet from potential spills or dropped objects.
Consider using a respirator or dust mask if working in a poorly ventilated area, as battery fumes can be harmful. Remember that PPE is not just a suggestion, but essential safety gear.
Properly Maintained Battery Compartment
A well-maintained battery compartment is essential for safety and longevity. Imagine a compartment with a sturdy, secure lid that closes tightly, preventing accidental contact with the batteries. The interior is clean and dry, free of debris or corrosive spills. Batteries are securely fastened to prevent movement and potential short circuits. Adequate ventilation is provided, either through vents or open spaces, to allow for the dissipation of hydrogen gas.
Cable connections are neat and organized, clearly labeled, and free from damage or corrosion. A spill containment tray is present beneath the batteries to catch any potential leaks. The compartment is well-lit, allowing for clear visibility during inspection and maintenance. Finally, a fire extinguisher rated for electrical fires is readily accessible nearby.
Mastering your travel trailer’s battery switch empowers you to confidently manage your RV’s power, ensuring a worry-free camping experience. By understanding the different types of switches, practicing safe handling techniques, and performing regular maintenance, you can avoid costly repairs and maximize the lifespan of your battery system. Remember, a little preventative care goes a long way in keeping your RV running smoothly.
Happy travels!
FAQ Resource
What happens if I leave my battery switch in the “off” position?
Leaving the switch off completely disconnects the house batteries from the trailer’s electrical system. This prevents parasitic drain but means you’ll have no power to appliances unless you’re plugged into shore power.
Can I use a battery switch with a solar panel setup?
Yes, many RV owners use battery switches with solar panels. The switch allows you to isolate the solar charging system from the house batteries if needed.
How often should I clean my battery terminals?
Ideally, clean your battery terminals at least twice a year or more often if you notice corrosion buildup. This helps ensure optimal power flow and prevents damage.
My battery switch is making clicking noises. What’s wrong?
Clicking sounds often indicate a faulty switch or low battery voltage. Check your battery voltage and inspect the switch for any damage. If the problem persists, consider replacing the switch.
